Bootstrap
BootstrapはTwitter社が開発したCSSの「フレームワーク」
Bootstrap公式サイト
レスポンシブ・ウェブデザインに対応
表示する端末の横幅にあわせ、最適なレイアウトに変化
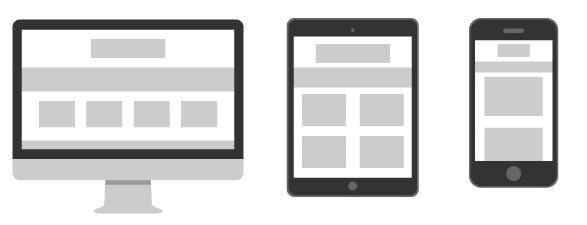
対応ブラウザ

Internet Explorer 7以下とFirefox 3.6以下はサポートされない
Bootstrapを使う準備
Bootstrapを使用するには、BootstrapとjQuery(JavaScriptのライブラリ)を読み込む必要がある。
読み込みの方法は以下2つの方法がある。
- ソースをダウンロードしローカルに配置
- ネット上のファイルを利用する方法(CDN)
HTMLファイル作成
Bootstrap公式サイトの[Getting started]にあるBasic templateのソースをコピーする。
不必要な箇所のコメントを削除しhtml lang="en"を`html lang=“ja"に変更
index.html
1
2
3
4
5
6
7
8
9
10
11
12
13
14
15
16
17
18
19
20
| <!DOCTYPE html>
<html lang="ja">
<head>
<meta charset="utf-8">
<meta http-equiv="X-UA-Compatible" content="IE=edge">
<meta name="viewport" content="width=device-width, initial-scale=1">
<title>Bootstrap Sample</title>
<!-- BootstrapのCSS読み込み -->
<link rel="stylesheet" href="//maxcdn.bootstrapcdn.com/bootstrap/3.3.5/css/bootstrap.min.css">
</head>
<body>
<h1>Hello, world!</h1>
<!-- jQuery読み込み -->
<script src="//ajax.googleapis.com/ajax/libs/jquery/1.11.3/jquery.min.js"></script>
<!-- BootstrapのJS読み込み -->
<script src="//maxcdn.bootstrapcdn.com/bootstrap/3.3.5/js/bootstrap.min.js"></script>
</body>
</html>
|
画面にHello, worldと表示されていればOK
コードの中身
index.html
1
| <meta http-equiv="X-UA-Compatible" content="IE=edge">
|
InternetExplorerのブラウザではバージョン毎に異なるレンダリングがされてしまって崩れることがあるので、互換表示をさせないために設定するmetaタグ
index.html
1
| <meta name="viewport" content="width=device-width, initial-scale=1">
|
レスポンシブ・ウェブデザインにするために必要なmetaタグ
index.html
1
2
3
4
5
6
| <!-- BootstrapのCSS読み込み -->
<link rel="stylesheet" href="//maxcdn.bootstrapcdn.com/bootstrap/3.3.5/css/bootstrap.min.css">
<!-- jQuery読み込み -->
<script src="//ajax.googleapis.com/ajax/libs/jquery/1.11.3/jquery.min.js"></script>
<!-- BootstrapのJS読み込み -->
<script src="//maxcdn.bootstrapcdn.com/bootstrap/3.3.5/js/bootstrap.min.js"></script>
|
重要なのは、BootstrapのJSより、jQueryを先に読み込むこと。そうしないとBootstrapのJavaScriptを使う動きが動作しないので注意
グリッドシステム
グリッドシステムを使うことで簡単にレスポンシブ・ウェブデザインでレイアウトを作成することができる。
使用にあたっては以下のルールがある。
- class=”container”か”container-fluid”の中に
- class=”row”の中に
- class=”col-{prefix}-{columns}”の形式で
- {columns}は合計値が12になるように指定
上記のルールでスタイルをつけると、簡単にレスポンシブ・ウェブデザインに対応した横幅を分割したスタイルを作成可能になる。

上記のルールに沿ったコードの使用例
exsample.html
1
2
3
4
5
6
7
8
9
| <header style="background-color:gray">Header</header>
<div class="container-fluid">
<div class="row">
<div class="col-sm-2" style="background-color:red;">Red</div>
<div class="col-sm-8" style="background-color:blue;">Blue</div>
<div class="col-sm-2" style="background-color:yellow;">Yellow</div>
</div>
</div>
<footer style="background-color:gray">Footer</footer>
|
上記ではPCのブラウザでは縦1✕横3で、赤2:青8:黄2の横幅の割合で表示される。
モバイル以下のブラウザサイズでは縦3✕横1で表示される。
画面ごとにカラム数が変化するレスポンシブなレイアウト使用例
exsample.html
1
2
3
4
5
6
7
8
9
10
| <header style="background-color:gray">Header</header>
<div class="container-fluid">
<div class="row">
<div class="col-sm-6 col-md-3" style="background-color:red;">Red</div>
<div class="col-sm-6 col-md-3" style="background-color:blue;">Blue</div>
<div class="col-sm-6 col-md-3" style="background-color:yellow;">Yellow</div>
<div class="col-sm-6 col-md-3" style="background-color:green;">Green</div>
</div>
</div>
<footer style="background-color:gray">Footer</footer>
|
col-sm-6でタブレットサイズ(768px以上)だと2分割、col-md-3でPCサイズ(992px以上)で4分割で表示される。
モバイル以下のサイズ(xs=768px以下の設定)はcol-sm-6を指定した時点でブラウザ幅768px以下は容赦なく縦積みになるので不要。
モバイル以下のサイズ(768px以下)でも1カラム縦積みじゃなくて2分割したい場合は以下のようにする。
exsample.html
1
| <div class="col-sm-6 col-md-3 col-xs-6">
|
col-{prefix}-{columns} の形式で合計値12を振り分けることで、簡単にマルチデバイスに対応したレイアウトを作成できるのがグリッドシステムの特徴
グリッドシステムのprefixの画面サイズの対応表
| 対応デバイス |
画面サイズ |
prefixの指定 |
prefixnの意味 |
| デスクトップ |
1200px以上 |
col-lg-* |
Large |
| デスクトップ |
992px以上、1200px未満 |
col-md-* |
Medium |
| タブレット |
768px以上、992px未満 |
col-sm-* |
Small |
| モバイル |
768px以下 |
col-xs-* |
Xtra Small |
表示/非表示の制御
visible-{prefix} や hidden-{prefix} を指定することで、画面サイズによってレイアウトを表示/非表示を制御できる。
PCやタブレットでは表示しておきたいが、スマホだと表示しても見にくいだけなので非表示にしてしまう、ということが簡単にできる。
例)Blueの部分をタブレットサイズ(768px以上、992px未満)の時だけ非表示
exsample.html
1
2
3
4
5
6
7
8
9
| <header style="background-color:gray">Header</header>
<div class="container-fluid">
<div class="row">
<div class="col-sm-2" style="background-color:red;">Red</div>
<div class="col-sm-8 hidden-sm" style="background-color:blue;">Blue</div>
<div class="col-sm-2" style="background-color:yellow;">Yellow</div>
</div>
</div>
<footer style="background-color:gray">Footer</footer>
|
グリッドシステムの詳細については公式サイトを確認
table
tableタグでテーブルレイアウト(表組み)を簡単に装飾
talbeの使用にあたっては以下のルールがある。
- class=”container”の中に
- table要素に対してclass=”table”をつける
lant:html exsample.html
1
2
3
4
5
6
7
8
9
10
11
12
13
14
15
16
17
18
19
20
21
22
23
24
25
26
27
28
29
30
31
32
| <div class="container">
<table class="table">
<thead>
<tr>
<th>#</th>
<th>Name</th>
<th>Email</th>
<th>Phone</th>
</tr>
</thead>
<tbody>
<tr>
<th scope="row">1</th>
<td>Hoge</td>
<td>hogei@example.com</td>
<td>111111111111</td>
</tr>
<tr>
<th scope="row">2</th>
<td>Foo</td>
<td>foo@example.com</td>
<td>2222222222222</td>
</tr>
<tr>
<th scope="row">3</th>
<td>Bar</td>
<td>bar@example.com</td>
<td>3333333333333</td>
</tr>
</tbody>
</table>
</div>
|
以下のように表示

1行間隔で背景色を変える
exsample.html
1
2
3
| <table class="table table-striped">
...
</table>
|

枠線をつける
table要素のclassに table-bordered を追加
exsample.html
1
2
3
| <talbe class="talbe table-bordered">
...
</table>
|
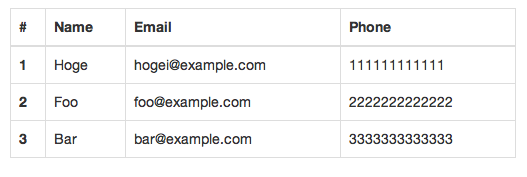
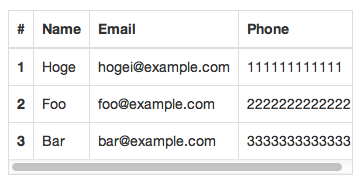
レスポンシブに対応
div class="container" とtable要素の間に div class="table-responsive" を追加すると、タブレットやスマホでテーブルが全て表示されない場合にtable要素内にスクロールバーが付く
exsample.html
1
2
3
4
5
6
7
| <div class="container">
<div class="table-responsive">
<table class="table table-bordered">
...
</table>
</div>
</div>
|
tableの詳細については公式サイトを確認
button
ボタンにスタイルを付けることができる。
buttonの使用にあたっては以下のルールがある。
- a要素、button要素のclassに
"btn btn-{プロパティ名}" を追加
プロパティの指定には以下のようになる。
| プロパティ名 |
表示 |
| default |
白地に黒文字 |
| primary |
青地に白文字 |
| success |
緑地に白文字 |
| info |
水色地に白文字 |
| warning |
オレンジ色地に白文字 |
| danger |
赤色地に白文字 |
| link |
白地に青文字 |
button sample
button.html
1
2
3
4
5
6
7
8
9
10
11
12
13
14
15
16
17
18
19
20
21
22
23
24
25
26
27
28
29
30
31
32
33
34
35
36
37
38
39
40
41
42
43
44
45
46
47
48
49
| <button type="button" class="btn btn-default">Default</button>
<button type="button" class="btn btn-primary">Primary</button>
<button type="button" class="btn btn-success">Success</button>
<button type="button" class="btn btn-info">Info</button>
<button type="button" class="btn btn-warning">Warning</button>
<button type="button" class="btn btn-danger">Danger</button>
<button type="button" class="btn btn-link">Link</button>
{# endraw %}
{% endcodeblock %}
以下のように表示

### button size 指定
a要素、button要素のclassに `"btn-{プロパティ名}"` を追加すると、ボタンのサイズの指定ができる。
{% codeblock lang:html button.html %}
{% raw %}
<p>
<button type="button" class="btn btn-primary btn-lg">Large button</button>
<button type="button" class="btn btn-default btn-lg">Large button</button>
</p>
<p>
<button type="button" class="btn btn-primary">Default button</button>
<button type="button" class="btn btn-default">Default button</button>
</p>
<p>
<button type="button" class="btn btn-primary btn-sm">Small button</button>
<button type="button" class="btn btn-default btn-sm">Small button</button>
</p>
<p>
<button type="button" class="btn btn-primary btn-xs">Extra small button</button>
<button type="button" class="btn btn-default btn-xs">Extra small button</button>
</p>
{% endraw % }
{% endcodeblock %}
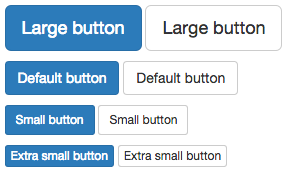
### block levelのbutton指定
a要素、button要素のclassに `"btn-block"` を追加すると、ブロックレベルのボタンを指定できる。
{% codeblock lang:html button.html %}
{% raw %}
<button type="button" class="btn btn-primary btn-lg btn-block">Block level button</button>
<button type="button" class="btn btn-default btn-lg btn-block">Block level button</button>
|

buttonの詳細については公式サイトを確認
from
整ったデザインフォームを作れる
formの使用にあたっては以下のルールがある。
- formタグの中に
- class=“form-group"を入れて
- inputタグにclass=“form-control"をつける
index.html
1
2
3
4
5
6
7
8
9
10
11
12
13
14
15
16
17
18
19
20
21
22
23
24
25
26
27
28
29
30
31
32
33
34
35
36
| <form>
<div class="form-group">
<label for="exsampleInputEmail">Email</label>
<input type="email" class="form-control" id="exsampleInputEmail" placeholder="Email">
</div>
<div class="form-group">
<label for="exsampleInputPassword">Password</label>
<input type="password" class="form-control" id="exsampleInputPassword" placeholder="Password">
</div>
<div class="form-group">
<label for="exsampleInputFile">File</label>
<input type="file" id="exsampleInputEmail" >
<p class="help-block">ファイルを選択してください。</p>
</div>
<div class="checkbox">
<label>
<input type="checkbox">check box1
</label>
</div>
<div class="checkbox">
<label>
<input type=checkbox>check box2
</label>
</div>
<div class="radio">
<label>
<input type="radio" checked>mele
</label>
</div>
<div class="radio">
<label>
<input type="radio">female
</label>
</div>
<button type="button" class="btn btn-default">Submit</button>
</form>
|
以下のようになる
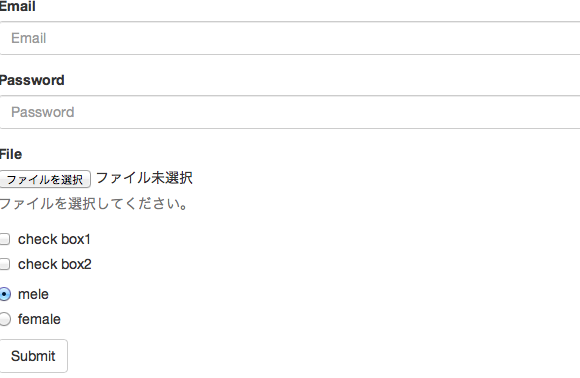
class="help-blockクラスを指定した要素でテキストを括ると.help-block ヘルプテキスト用のスタイルを設定できる。- checkbox と radio は、 .form-group クラスではなくそれぞれ専用のクラスが用意されている。
inline form
フォームを以下のようにインラインに並べたい場合は、formタグに class="form-inline" をつける。
index.html
1
2
3
4
5
6
7
8
9
10
11
| <form class="form-inline">
<div class="form-group">
<label for="exsampleInputNmae">Name</label>
<input type="text" class="form-control" id="exsampleInputNmae" placeholder="Name">
</div>
<div class="form-group">
<label for="exampleInputEmail2">Email</label>
<input type="email" class="form-control" id="exampleInputEmail2" placeholder="Email">
</div>
<button type="button" class="btn btn-default">submit</button>
</form>
|
以下のようになる

horizontal form
ラベルと入力欄を垂直に並べるのではなく、水平に並べたい場合は、formタグに class="form-horizontal" をつける。
index.html
1
2
3
4
5
6
7
8
9
10
11
12
13
14
15
16
17
18
19
20
21
22
23
24
25
26
27
| <form class="form-horizontal">
<div class="form-group">
<label for="inputEmail" class="col-sm-2" control-label>Email</label>
<div class="col-sm-10">
<input type="email" class="form-control" id="inputEmail" placeholder="Email">
</div>
</div>
<div class="form-group">
<label for="inputPassword" class="col-sm-2" control-label>Password</label>
<div class="col-sm-8">
<input type="password" class="form-control" id="inputPassword" placeholder="Password">
</div>
</div>
<div class="form-group">
<div class="col-sm-offset-2 col-sm-10">
<div class="checkbox">
<label>
<input type="checkbox">Remenber me
</label>
</div>
</div>
</div>
<div class="form-group">
<div class="col-sm-offset-2 col-sm-10">
<button type="submit" class="btn btn-default">Sign in</button>
</div>
</div>
|
以下のようになる

.form-horizontal クラスを指定したブロック要素で括ることで、水平レイアウトを使用できる。- 基本的な考え方は Grid system と同じで、
.col-**-## クラスを使用してレイアウトを調整する。
label タグには、 .control-label クラスも指定する必要がある。.form-group クラスが .row クラスを兼ねているので、 .row クラスを指定した要素は不要。- classに
"col-md-offset-"などで始まり数字を付加したクラス名をつけると前に指定列数分だけ開けることができる。
formの詳細については公式サイトを確認)を確認


